Post by F1Fan07 on Mar 30, 2012 17:33:47 GMT -8
OK all you painters. I am about to blow your mind. 
Have you ever done a paint and found a logo is flipped or inverted? Get confused looking at a template as to what is what? Ever had your logo stretched like a TapOut shirt on a fat guy?
I stumbled on this trick over in the iRacing paint forum and whipped up a little tutorial.
The VE Holden template is pretty straight forward and it's what I used for an example but I should've used the Historic GT Ferrari 275. Its rear end is in mirror image and the door mirrors use totally stretched out of proportion textures... for some reason known only to the guy that developed the car template. It's fenders take weird curves that will test the patience of a Tibetan monk... if a Tibetan monk decided to take up car painting, that is.
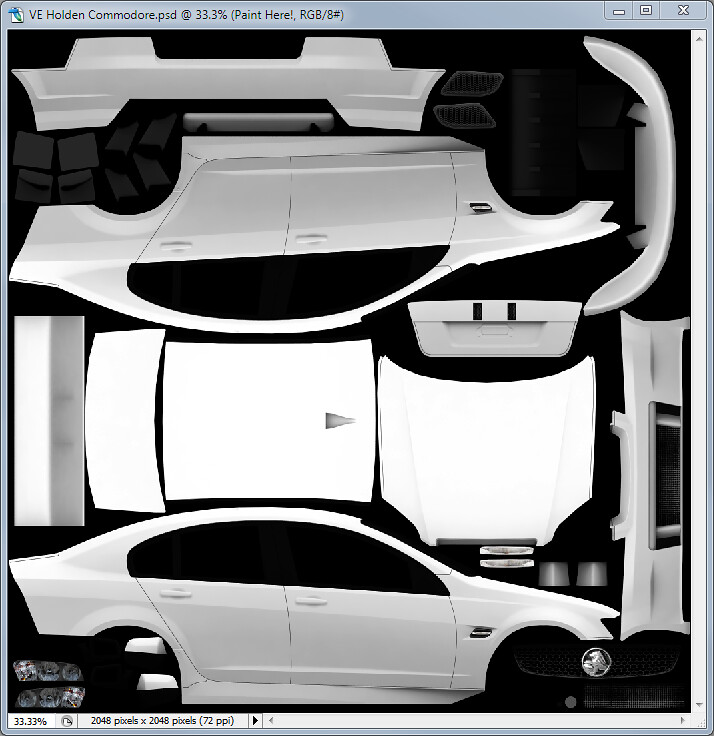
So here's your template. No problem, right?

Well, even on a simple template some car model designer like to flip these (circled in MS Paint awesomeness) bits in weird orientations. Heck, it might not be obvious to you which way they go.

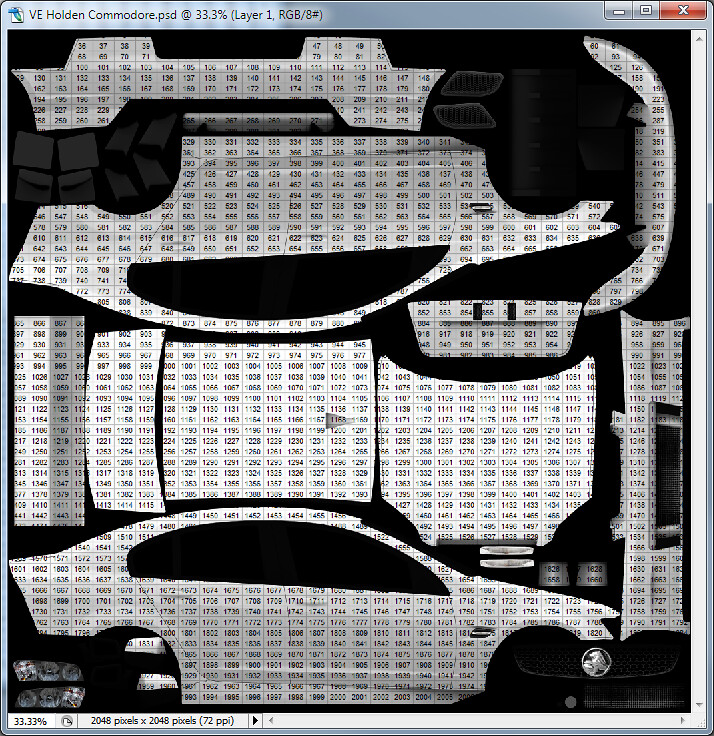
So what's a boy to do? Enter SpotFinder, a simple 2048 x 2048 pixel grid of numbers.

Copy it into your painting layer and whalla, you got a handy reference grid.

Are you seeing the light yet? Maybe this helps:

Yeahhhh, boyeee. Keep a screenshot of the templated grid and a few isometric views of the car (hell, print 'em out for reference). Now you know where things go.
What does this show us beyond identifying which parts of the PSD file are applied to parts of the car?
1) You can now align graphics with key parts of the car very accurately minimizing trial-and-error.
2) Look at 1755 above the fender. Any decal there is going to get stretched. So you're going to have to look at the wireframe in the template and try to adjust for that.
3) Also note the Komatsu logos on the headlight. Don't bother looking for hidden layers in the PSD... they're maybe coming from another file that you didn't apply SpotFinder to or they're part of the alpha channel.
4) On some other car models you might notice that the textures on the front splitter are inverted. It's OK here though.
5) You now know which part of the rear wing is topside and which is bottom.
Here's a link to my SpotFinder file:
dl.dropbox.com/u/25238931/spotfinder%20WHITE%20%202048%20x%202048.png
Something of note: the original was 1024x1024 because those are the dimensions of an iRacing paint file. I upscaled it to 2048x2048 for rFactor but in the process also made the rectangles bigger. So I made this one if you want finer resolution. It's the 1024 file copied into four coloured quadrants.
dl.dropbox.com/u/25238931/spotfinder%20COLOUR%20%202048%20x%202048.png

Have you ever done a paint and found a logo is flipped or inverted? Get confused looking at a template as to what is what? Ever had your logo stretched like a TapOut shirt on a fat guy?
I stumbled on this trick over in the iRacing paint forum and whipped up a little tutorial.
The VE Holden template is pretty straight forward and it's what I used for an example but I should've used the Historic GT Ferrari 275. Its rear end is in mirror image and the door mirrors use totally stretched out of proportion textures... for some reason known only to the guy that developed the car template. It's fenders take weird curves that will test the patience of a Tibetan monk... if a Tibetan monk decided to take up car painting, that is.
So here's your template. No problem, right?

Well, even on a simple template some car model designer like to flip these (circled in MS Paint awesomeness) bits in weird orientations. Heck, it might not be obvious to you which way they go.

So what's a boy to do? Enter SpotFinder, a simple 2048 x 2048 pixel grid of numbers.

Copy it into your painting layer and whalla, you got a handy reference grid.

Are you seeing the light yet? Maybe this helps:

Yeahhhh, boyeee. Keep a screenshot of the templated grid and a few isometric views of the car (hell, print 'em out for reference). Now you know where things go.
What does this show us beyond identifying which parts of the PSD file are applied to parts of the car?
1) You can now align graphics with key parts of the car very accurately minimizing trial-and-error.
2) Look at 1755 above the fender. Any decal there is going to get stretched. So you're going to have to look at the wireframe in the template and try to adjust for that.
3) Also note the Komatsu logos on the headlight. Don't bother looking for hidden layers in the PSD... they're maybe coming from another file that you didn't apply SpotFinder to or they're part of the alpha channel.
4) On some other car models you might notice that the textures on the front splitter are inverted. It's OK here though.
5) You now know which part of the rear wing is topside and which is bottom.
Here's a link to my SpotFinder file:
dl.dropbox.com/u/25238931/spotfinder%20WHITE%20%202048%20x%202048.png
Something of note: the original was 1024x1024 because those are the dimensions of an iRacing paint file. I upscaled it to 2048x2048 for rFactor but in the process also made the rectangles bigger. So I made this one if you want finer resolution. It's the 1024 file copied into four coloured quadrants.
dl.dropbox.com/u/25238931/spotfinder%20COLOUR%20%202048%20x%202048.png


